|
press F11 for full screen
...fly tying is
the next best thing to fishing; it is the sort of licking of the
lips that eases a thirsty man in the desert.
Arthur Ransome,
"Fly Tying in Winter" - Rod and Line
(1929)
The Jaded
Hooker
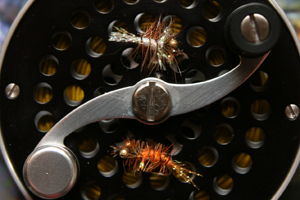
This pattern
is both buggy and fishy
To see the
results of the Jaded Hooker's first field test for Steelhead, please
visit the link below.
We stuck twenty, landed ten.
Three out of my five preferred the Jaded Hooker over an egg
pattern.
Tying the Jaded
Hooker
Hook:
original Jaded Hooker tied on a Mustad Streamer Fly Hook #9672, size
8.
Tail: Crystal Splash, Golden Stone
(Peacock color if more natural abdomen color used)
Body: Orvis Spectrablend, Nymph, Scud,
Orange (or Dave Whitlock's SLF red squirrel nymph-thorax, or any tan
rabbit dubbing if a more subdued look is what you're after). If you
tie the more subdued version, use Peacock color crystal splash for
wingfin and tail.
Thorax: Balled Peacock
Herl or synthetic peacock if you prefer.
Hackle: Furnace
Hackle to fit hook size, -- use one with well defined charcoal fiber
center to emphasize segmented body.
Wingfins: Crystal Splash, Golden Stone,
peacock if using subdued abdomen color
Eyes: Small bead chain, stainless or brass,
depending on color choices for body. I use black for my weighted
versions tied with lead wire underbody.
Head: Several wraps of red thread 6/0 to
secure eyes and form cone nose.
1) Start thread on front 1/3 of hook shank, tie in bead chain
eyes one bead chain eye diameter behind hook eye. Secure placement
of eyes with one drop head cement.
2) wrap thread back 1/3
of the length of hook shank behind bead chain eyes and tie in the
crystal splash. The crystal splash should be folded over itself 3-4
times, tied in the center and splayed in spinner wing fashion,
keeping each wingfin opposite the other and perpendicular to the
hook shank. (forgive my redundancy) Leave the formed loops alone for
now.
3) Wrap thread back to
the end of shank/beginning of hook curve to tie in another strand of
crystal splash, again folded, but only 2-3 times, whichever is less
than the wingfin fold, as you will double the forward loops back
over to join the rear facing loops, once secured to the hook shank.
Secure the doubled over crystal flash loops so all are facing the
rear.
Trim tail in proportion to hook size -- use your
discriminating judgment.
4) Prepare and tie in the furnace
hackle. If you do not have furnace hackle, use ginger saddle hackle,
but tie in a strand of peacock herl to be wrapped with it back over
the body to form the segmented abdomen look you want for this fly.
5) Dub your abdomen with your preferred dubbing material
over hook shank, and criss- cross wingfin section to secure wingfins
in place. Wrap thread to rest just behind the eyes.
6) Tie in 4 strands of lengthy peacock
herl right behind the eyes and anchor the length of shank between
the eyes and the wingfins, then wrap and secure thread with half
hitch in front of eyes.
7) Rotate vise and
form peacock herl thorax to form a juicy meaty looking ball between
the wingfins and eyes, beginning from the wing fins and moving
forward. Some doubling-over with the peacock herl will be necessary
to form a seductive looking ball. Tie off herl strands right behind
the eyes and trim remaining strands.
8) Loosely wrap thread
back over herl thorax and abdomen to form a consistent taper, making
sure not to compromise the balled thorax too much. This will extend
the life of the fly from the action it will receive. Return thread
to the front of the eyes and half-hitch and rest the spool before
rotating hackle.
9) Palmer the hackle
and tie off behind the eyes. Be careful to maintain even abdominal
segments the length of the fly especially around the wingfin loops.
10) Form the head by wrapping thread
several times around eyes and wrap to form cone nose. Whip finish.
Secure thread with 1-2 drops of deep penetrating head cement.
11) Trim the wingfin loops the length of the hackle fibers.
Splay wingfins among hackle fibers.
12) Admire your work,
and go stick 'em!
Originators
notes and variations: I've tied in natural deer hair for
the tail and wingins on the more subdued color schemes. It's
attractive and offers a nice traditional
touch.
The fish’s interest in this fly, I
believe, comes from the wingfins and the attracting quality of the
crystal splash, let alone the fact that the fly just looks cool.
(Cool being defined as both fishy and buggy looking as one might
expect from a jaded hooker.) The balled peacock herl thorax is also
something I believe fish have a hard time passing up.
This
fly may be fished on dead drifts, or skated on the surface. Both
techniques proved fish-provoking.
Tight Lines,
j
|